Pages

Thursday, October 31, 2013

WIP Wednesday: Halloween Edition

Well, Halloween crept up on me again and I am rushing to get the costumes finished, typical!  One day I am going to stop saying, "Oh, I can make that" and just buy the darn things.  Granted I am not making all four, so baby steps I suppose.  Luckily my oldest, who is now thirteen took the reigns on her costume and I only had to help a little, which was awesome.  Then on the opposite end of the spectrum in my two year old, who wants to be the Little Mermaid with the pink dress....pretty specific I thought!  I had a Simplicity pattern that I am basing the dress on, and I just made a few modification to make it look a bit more like the Little Mermaid's dress from the movie.  

In addition to the dress I also need to make a quick Jedi tunic...talk about last minute!  At least that one doesn't have to be done before school, so I have a few more hours. I cannot wait to finish up with these costumes so that I can get back to my other sewing and also finally finish up a quilt I have been quilting for what seems like ages!  Until Friday....

This post is linked up with WIP Wednesday at Freshly Pieced.

Sunday, October 27, 2013

Update on Countdown to Christmas Quilt Along

Here is my pieced advent quilt for the Countdown to Christmas Quilt Along at Better Off Thread.  I decided to put the pockets in order since Goob is still learning how to count.  She is up to about 20 so far, so the advent will be a great learning tool I think....with positive reinforcement....presents!  I also decided to make four rows of six instead of six row of four, so the quilt will be wider and shorter rather than the opposite.  I did not off set the pockets either as the pattern said to do.  I think I like the result, however I might add something to it, but I am not really sure yet. 


Saturday, October 26, 2013

Cloud 9 Grocery Tote and Zipper Pouch Wrap Up

I talked a little bit about the free Cloud 9 Tote with Zipper Pouch Pattern on Wednesday, however I had not made the zipper pouch yet at that point.  
I "tried" making two of the original four zipper pouches, and pretty much failed.  At one point I thought I was just going to throw it away (it has been a long week so perhaps I was just overly tired and frustrated....don't know).  I am actually pretty embarrassed that I had such a hard time and couldn't figure it out, but while I have basic knowledge of bag/pouch construction I don't have a ton of experience.  The instructions, I felt were fairly vague for the pouch portion of the pattern.  This could be because I have never made a pouch like it before.  There were diagrams included, however they didn't help me much because I understood that part of the construction. The illustrations did not clarify what I wasn't understanding from the text portion of the pattern.  So, the first pouch was pretty much a bust!  I took it apart several times and then ended up putting it together in a way that it would work....not necessarily what the pattern indicated.  Then again I wasn't sure that the pattern even gave a way to put it together completely.  Once I finished the first pouch it wasn't even large enough to put the rolled up grocery tote into, so at that point I was determined to figure out what the heck the problem was.  It will fit my new business cards so perhaps this is now my new business card holder!

I am about 99.9% sure this is not how it is supposed to go together (see below), one reason being I cut a decent amount of fabric off of the bottom piece of the pouch (pretty sure this is not what it is supposed to look like....)!
 
On the second pouch, I sewed the bottom piece on first (which was not what the instructions said to do) and it seemed to help a little, however then it seemed that the zipper was too short for the pieces.  I don't think it was and the pattern definitely called for a 7" zipper (which I didn't even trim like the instructions said to do on the second pouch).  I pretty much just didn't entirely get the construction of the the pouch.  Either way, I pieced the pouch together to make it resemble the shape pictured on the blog.  Unfortunately, the photos on the blog are not very close, so I could not figure out my issues from that either.  The pouches look so much better in their photos than I feel mine turned out, however, my second attempt was definitely more like theirs.

These two shots of the second pouch were taken with tissue stuffed in it to hold its shape.  Without the tissue it looks a lot like the first pouch.  But, you can see that the side looks different, because I did not cut any of the bottom piece off.  The bottom piece was a different width than the sides, so you can see it is a bit pleated looking, and is actually not fully sewn inside.  Too hard to explain what I did....sorry!
In conclusion, I really like the tote.  It was easy to put together and I think the end result is cute and functional, plus it only uses one yard of fabric!  Beginners might still have a little difficultly with the tote, for example if they don't know what a french seam is, but overall it is a pretty simple tote.  As for the pouch, I feel that the instructions are more difficult to follow, especially if you are a beginner since they seem a little vague.  I also didn't like how the tote fit into the finished pouch (I did not see any pictured on the tutorial page with the tote inside of the pouch) .  So here is a photo of my tote rolled up in the pouch.
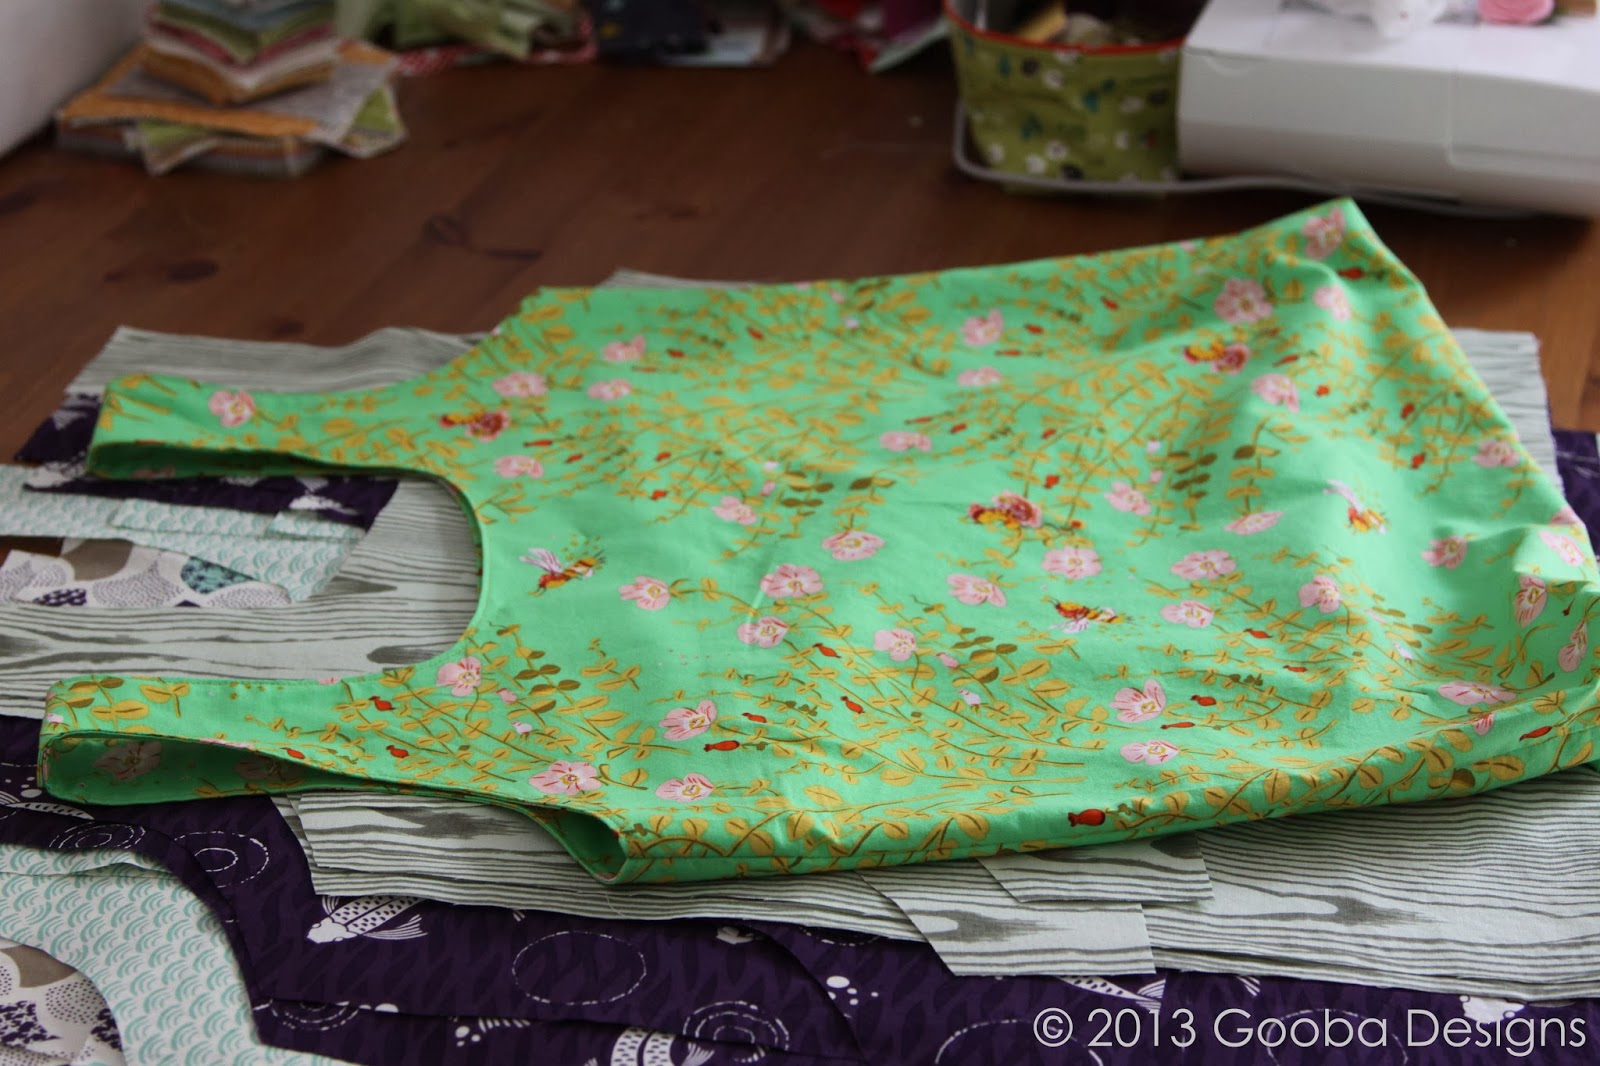
Below you can even see how stressed the seams are!  The instructions give a specific way to fold then roll up the tote to put it in the pouch (see photos at the end of post), which I followed and these two photos, above and below, show the result based on the pattern instructions.
I was thinking of making a small drawstring pouch for the bags that might work pretty well.  I will have to let you know how that one goes.  I would make a ton more of the bags, but not the pouches.  Anyway, I will leave you with a few more pictures, and check out my previous post about the tote (link at beginning of this post) to see more detailed photos of the construction of the tote.

Quick note on fabric used:  Nanny Bee in green from Heather Ross' Briar Rose Collection and Scalloped Edge in ivory from Rashida Coleman-Hale's Koi Collection.

Thanks for stopping by...


This post is linked up with Finish It Up Friday at Crazy Mom Quilts and Show Off Saturday and Sew Can She.

Wednesday, October 23, 2013

WIP Wednesday: Cloud 9 Tote with Zipper Pouch

Today I was working on finishing up some totes with matching zipper pouches, for a party that I was supposed to attend tomorrow night.  Now I don't get out much so I was pretty excited, but then the party was cancelled this afternoon...bummer!  There was definitely a good reason for the cancellation, so I am not complaining too much.  But now at least I will have more time to finish up the totes and pouches.  I was not worried about finishing the totes by tomorrow evening, but I was a little worries about the pouches since I realized today that I didn't have the correct color zippers and never got a chance to go out and get them today.  I guess tomorrow I will have to go to the fabric shop to get some zippers...oh darn...wink, wink!

As for the pattern that I used for the totes and pouches, I found it on Cloud 9 Fabric's blog as a free pdf download.  I was a little skeptical at first about the bag since there is no interfacing or anything like that at all.  The pattern just calls for quilting weight cotton fabric, and only one yard at that!  Now the bag is supposed to act as a grocery bag, so it is not really meant to hold its shape, so the lack of interfacing did make sense...either way I had to try it.  It turns out I really like the tote....simple but pretty!  


I have only made one tote so far, and none of the pouches.  I have, however, cut out all of the fabric for four additional bags and I have started constructing some of them.  I will most likely stay up tonight again and try and get some more finished.  I used some fabric from the shop, including Nanny Bee in green from Heather Ross' Briar Rose collection (I have been waiting to use that for something), the woodgrain print in moss from Erin Michael's Lush Uptown collection, and then of course a couple of prints from Rashida Coleman-Hale's Koi collection (as you can tell from some of my recent projects, this is one of my favorites).

The bag is cleverly constructed with no exposed seams.  The top handle portion of the bag has a lining piece which you sew on with right sides together and then turn right side out.  You do this for both halves, then you join them at the top by overlapping the finished ends.  I wasn't sure if I would like this and almost used a different method, but I didn't and I like how it turned out.
Then once you get the two halves joined at the tops of the handles, you sew the bag together around the sides and bottom using a french seam, which I always love to do. 
 Anyway, I won't go into too much detail since the directions in the pdf pattern on their blog are easy to follow and have diagrams....awesome!  Like I mentioned before, I have not even started the pouches so I cannot attest to the construction of that yet, but I am thinking they will come together well.  Until next time....

This post is linked up with WIP Wednesday at FreshlyPieced.com

Friday, October 18, 2013

Everyday Skirt by Liesl + Co: A Pattern Review

Liesl + Co just released four new women's patterns this week as digital downloads, and of course, I just could not resist the overwhelming temptation to at least try one of them....well, I ended up getting two!  How weak is that?  Anyway, at first glance I liked the Weekend Getaway Blouse the best, but the more I looked at the Everyday Skirt pattern the more I fell in love with it.  Perhaps it was the combination of the yellow skirt and grey v-neck (probably an all-time favorite), I don't know, but I decided I had to have both.  Oh, and did I mention the skirt has pockets....awesome!  
While looking through my stash I "discovered" my peachy pink, super soft wool fabric I got ages ago and decided it was perfect.....and of course couldn't wait to try it out using this new pattern.
However, I could not decide what size to make.  I cut out the larger of the two, thinking I could just down-size it if I needed to, but couldn't bare to cut my wool fabric until I was sure.  So, I checked my stash once again and found a neat linen/cotton blend fabric that I got super cheap a few months ago that I could use to make a test skirt.  Long story, somewhat short, I have lots of pictures to show you of my first Everyday Skirt (but please excuse my pasty legs they don't often see the light of day...yikes).  Hopefully you can get a good idea of what to expect from the pattern, then again Liesl + Co/Oliver + S haven't let me down yet.


Everyday Skirt by Liesl + Co Pattern Review

The Everyday Skirt pattern is a digital download that you can print out on your home printer, including the instructions and the pattern pieces, which you then tape together and cut out.  What I love about digital downloads is that you can print it out as many times as you want and cut your size directly out instead of using tracing paper.  The downside is that it does take quite a bit of paper, but you always have the back up just in case something gets lost or messed up or you need a different size.  Plus, I like the instant gratification of have the pattern immediately...sometimes I can be so impatient.  As far as taping the pages together to make the pattern pieces, it is super easy, because each piece has a number and letter combination that matches with its corresponding piece.  You do need to make sure that you print your pattern on actual size, by going into the printer properties and selection the "actual size" option and not the "fit to page" option for example.  Then double check that the sizing is correct by measuring the one inch reference on the pattern print out.  I did notice that some of my lines were ever so slightly off even when I lined up one of the other sides of the piece, but the difference is negligible and did not cause any problems with constructing the skirt.
The pattern has six pattern pieces:  a front panel, back panel, side panels, a waist band, pocket lining, and pocket I actually don't have the pocket lining piece in the photo above).  You need two of the side panel, pocket lining, and pocket and the rest you only need one.  The pattern provides yardage for both 44" wide and 60" wide fabric.  The yardage for the 44" wide is right on, but I think that with the 60" wide you could get away with using less if you use a different fabric to line your pockets.  I am going to try this on my next version of the skirt using my wool fabric, and I will let you know how it turns out.

The skirt goes together really easily and relatively quickly.  I was able to finish in a few hours once my pieces were cut out.  I did have to pause several times to tend to my two year old, so it would probably not even take that long if your were uninterrupted.  As far as everything lining up, I only had one issue.  The way I interpreted the pattern was that the flat front waistband should have lined up with the back waistband, so that the stitching would look continuous around the entire waistband when you were finished.  On my skirt however my back waistband was about a 1/4" or more shorter that my front waistband (and my length at the bottom of the skirt lined up perfectly).  It did not seem to cause any issues as far as construction and it does not look too bad that the front and back waistbands are different heights.  I am curious, however, to figure out why this might have happened.  I went back to make sure that my pattern pieces were correct and they seemed to be and then I double checked how I constructed the waistband and I am pretty sure I constructed everything properly.  With that said it could very well still be a user error, so I will pay very close attention on my next skirt to see if I run into the same problem or not.
Another note about the waistband is that the back half has elastic, which is great because it makes it easy customize it to fit you, plus would doesn't love a stretchy waist band?  In addition, I love that is uses two bands of 1/2" elastic instead of one wide once, because it seems to conform to your body well and doesn't make it too stiff and uncomfortable.
For the skirt hem, I feel that they gave a decent amount of length on the pattern to play with.  I think I am around 5'6" and I cut 2" off the bottom and then used the suggested 2" hem and in hits at the top of my knees.  I think on the model on the front of the pattern it is even shorted than that, but either way they give you quite a bit of length to play with.
Overall this pattern is great.  It is quick, easy, cleverly constructed and most of all the end result is comfy and versatile.  I highly recommend it to anyone from beginners to pros.  Also, please let me know if I left anything out or messed anything up.  Thanks for stopping by and I hope you found this helpful!

Update:
Here is my second Everyday Skirt made with the pink wool I mentioned previously.  I did modify the fold on the top of the back waistband/piece, by only folding it over 1/4" instead of the suggested 1/2" in the pattern instructions.  It lined up nicely with the front waistband when I did that.  I also received an email from Oliver + S suggesting to modify the back piece (#6) by adding 1/4" to the length, either way your waistband would line up!   
In the photos I am wearing the skirt with the silk blouse I made using Simplicity 1690, a Leanne Marshall pattern.  As I mentioned in one of my previous posts, I only had one yard of each, the silk and the wool, so I had to find a pattern that I liked but would also work with the amount of fabric I had.  The only bad thing is that it turns out that the wool for the skirt is a bit sheer...you can see the blouse tucked in underneath.  It actually makes it look like I am wearing black underwear!  Oops, I will have to figure out how to fix that one later.
Lastly, you might have noticed that this second skirt is a bit longer than the first one I made.  With this one, I did not shorten it at all, so it is the original length of the pattern.

This post is link up with Finish It Up Friday at Crazy Mom Quilts.

Wednesday, October 16, 2013

WIP Wednesday: The NEW Everyday Skirt from Liesl and Co.

Yes, yes, I know starting a new project is pretty much the last thing I need to be doing right now, but I couldn't resist.  My will power when it comes to new sewing patterns, especially Oliver + S/Liesl and Co, is basically non-existent!  This week Liesl and Co, the masterminds behind Oliver + S patterns, just came out with four new adult patterns.....awesome (thanks again for the heads up Jessica)!  I resisted buying two of the patterns for a little over 24 hours, and then I cracked.  I bought the Everyday Skirt and the Weekend Getaway Blouse and Dress patterns.  I have big plans for both already, however when I started looking at my stash of apparel fabric, I found a pale peachy wool that I found in the clearance section at Textile Fabrics in Nashville, TN a long while ago (love this place by the way).  It was only one yard of 56" wide fabric, but it was so soft (wish you could touch it) and matched a black and peach dot silk fabric I also found in the clearance section.  Did I mention it was only $15!  
 Anyway, I finally made a simple t-shirt like blouse from the silk fabric....also only a yard...so I was a bit limited to what I could make with it.  It took some effort, but I made the pattern work with what I had and I am pleased with how it turned out.  As for the peach wool, my original plan was a simple pencil skirt, much like the one on the cover of the Weekend Getaway Blouse and Dress pattern (similar to the look I was going for).  However, I also realized that the peach wool would look good with my new Datura blouse that I finished a few days ago, but not so much as a pencil skirt.  Plus, I never get to dress up fancy anymore, so a pencil skirt probably would not get as much wear.  So, the first thing I did was check the yardage requirement for the new Everyday Skirt.  I think the pockets are what REALLY sold me...LOVE them!
 The pattern called for 1 3/4 yards even for a 58" wide fabric, and I only have one yard....not even close...but when I get something in my head it is really hard to shake, so that is when I bought the pattern, printed it out, taped it up and cut the pieces out to see if it really would not work.....and I think it will!!!!
I will of course need two of the elongated trapezoid piece in the top left, but once I cut the others out I should be able to simply fold the remaining strip in half and get two pieces.....hopefully.  I am super excited about this one.  I wish I had more of it finished to show you but...you know, life happens.  Who knows, maybe I will get lucky and find enough time to get it finish by Friday...I really can't wait!

In addition to this new project that I so ridiculously started with so many in the waiting, I am also still slowly working on my previously posted WIPs.  I am hoping that I will have something accomplished by Friday to share with you.

Thanks for stopping by and see you Friday...

This post is linked up with WIP Wednesday at Freshly Pieced.

Sunday, October 13, 2013

Countdown to Christmas Quilt Along: Numbers Applique

I had a hard time deciding what technique to use for the numbers on my advent quilt for the Countdown to Christmas Quilt Along over at Better Off Thread.  I thought about doing reverse applique, a technique I came across in a neat book a little while ago called Pretty in Patchwork Holiday.   Really liked this book by the way, but I felt that the reverse applique would take too long.  Then I wanted to use my fabric scraps and do "regular" applique, but I didn't want to iron a bunch of Wonder Under.  That lead me to wool felt for the numbers.  I figured I could just cut them out and do a quick stitch around the edge.  
Plus, I felt that using solid colors would be a better contrast against the patterned pocket backgrounds.  I got some really great wool felt from Kindall Krafts on Etsy.  Great prices, fast shipping, and wonderful product!  On top of all that, the felt was so cutely packaged with a super sweet felt flower clip....loved it!  I was, however, a little worried about the colors matching, but I got lucky because they were all pretty perfect matches, except the blue was a little off....but still works!
As you can see, I haven't had a chance to sew all of the numbers down yet, however I am hoping that it will help increase the contrast on some of the pockets.  For example, pocket 14 was a tough one because the presents print is pretty bold and the green numbers have a hard time popping out....again I hope that stitching around the numbers will help a bit.
For the numbers, I used a font called Glasket, which I believe I downloaded from a website, like fonts.com or something like that a while ago.  I liked it a lot because it had an art deco kind of feel to it and well, I am a sucker for anything art deco!  I used Microsoft Word and typed the numbers at a size of 260, then formatted the font to outline only and printed 0 through 9.  I used template plastic over the print out and traced the numbers, then cut the numbers out of the template plastic.  Using the number templates, I traced outlines onto the wool felt and then cut them out, and voila....
Anyway, at least I got all of the numbers cut out...yay!  I need to keep chugging along and get this project together.  Thanks for checking it out.  Hopefully, I will have more to show you soon!

Saturday, October 12, 2013

Finish It Up Friday: Datura Blouse

This was one of those weeks were I was hopeful and positive that I would get a lot done.  I should know better at this point, that most things don't work out as expected!  I did not get too much done this week, but perhaps the weekend will be different.  I did manage to get my Datura blouse that I have been working on mostly done.  I still need to decide on buttons and I believe I am going to hand stitch the hem, but for the most part it is finished.  I think I am going to write a review of the Deer and Doe pattern for the Datura blouse, but that will come a little later.  Below is what I have so far, what do you think?

I used Kaufman Essex yarn dyed linen in flax for the yoke and The Way of Flowers from the Koi Collection by Rashida Coleman-Hale for the bottom.  Both of these are two of my favorites!  I really love this print.  The colors are wonderful and I love the little dragonflies scattered about.
 
Today's post is going to be short because it is my husband and my anniversary today, plus we are trying to get ready for a 13 year old's birthday party...this should be interesting. I love how I didn't realize what date it was when I said yes to the party....ooops.  Anyway, I am going to try and have a big finish next week, wish me luck!  Until then have fun creating!

This post is linked up with Finish It Friday at Crazy Mom Quilts, as well as Show Off Saturday at Sew Can She.  Thanks again!

Thursday, October 10, 2013

WIP Wednesday: Purse Palooza!?!?

I just want to know....where does the time go?  I am sure most of you feel the same way.  Don't you remember when we were kids and time seemed to go by so slow?  Then you get older and all you want it to do is have SOME time to catch up!  

Okay, on to the purpose of this post.  I was doing a bit of blog reading the other day and came across information on Purse Palooza, which started September 30th over at Sew Sweetness.  There will be around 40 reviews of bag patterns during the event and I believe 20 giveaways!  I have placed a button on the sidebar that will link you right to the page with all of the info.  One of the reasons I mention this is that you can link up pictures of your own bag creations during the event, until November 11th.  I have quite a few "work in progress" bags that need finishing, so I figure why not use this event to get me to actual finish them.  I told myself that I was not allowed to start any new ones.....but I have to admit I am a little tempted since I bought the metal coin purse frame the other week at Finch Sewing Studio.

Now for the bags, I have two bags, both from Amy Butler's Style Stitches that I started a while ago.  
I didn't get too terribly far on either of them, so I think I have my work cut out for me.  The first is the Cosmo bag, which is featured on the front cover.  I found some Heather Bailey home decorator weight fabric at Olde City Quilts one time.  They usually have a great selection of sale fabrics at great prices.  I didn't have a particular project in mind when I bought it, I just like it and the price!  Then when visiting my aunt I saw she had made a Cosmo bag, which pretty much sealed the deal.  I will be using the Heather Bailey home dec weight fabric on the outside and some of her quilting weight cotton fabric I had in my stash for the inside.  I think that it will all look nice together, don't you?
For the second bag, I am going to finish up a Perfectly Pleated Clutch.  I changed the shape of the clutch a little bit and I think I am going to change the strap as well, but not too sure.  I actually stopped working on this project after I pleated the first side of the clutch and didn't really want to do the other side!  Anyway, I am hoping to get both of them done before the deadline....we will see. 
Then last but not least I have my cut out Datura blouse.  I made a muslin this time, because I was told that the sizing was pretty precise.  The muslin worked out and the size 38 was perfect without any changes...phew!  So I cut the pieces from my real fabric, but I haven't had a chance to start sewing it yet.  I am hoping I can get it done by tomorrow...but that might be wishful thinking again.  Wish me luck, please!
This post is linked up with WIP Wednesday at Freshly Pieced. Until next time, have fun creating!