Pages

Monday, December 15, 2014

Modern Building Blocks Quilt Along: Month 3 - Section C

I know I am so late again this month getting the quilt along post finished, but we have had so many hurdles come up with our family and it has just been a bit difficult to keep up. That said, I am not finished with my blocks for this month, however I finished the 30" block, #3, that you can see below and I plan on getting the other eight finished and posted as soon as possible.  You can always reprint or check out our nifty printable pdf checklist for the blocks and sections in our original "Plan of Attack" post.
Because I am having trouble keeping up myself, I have decided to extend the date for linking up your Section C to 18 January 2015.  This way we can get the holidays out of the way and have a bit of time to catch up.  Plus, Section D/January only has five blocks so it should all balance out.  Hopefully you guys don't mind and I apologize again for having to change things around a bit and for not being terribly punctual.  

As I am finishing up the Section C blocks, I will post a couple more updates to show my Section C blocks as examples.  I will keep the photo link up on this post, so when you finish your Section C please come back to this post to link up.  You will have until 18 January.

Now for the fun parts!  First up is our winner for Section B, which is Peggy Aront. Congrats Peggy!  You should check out Peggy's gorgeous blocks.  She is using Denise Schmidt prints and her quilt is looking beautiful.  I cannot wait to see it finished.  Also, since I made you guys wait so darn long for this post, I would like to also send a little something to Stacey and Susan as well.  If you guys contact me via email, I will get your prizes out as soon as possible.  Thank you so much for participating and sharing!

And lastly, for our Section C prize, we have an Aurifil small spool sampler with six spools of different thread types in red (including Aurifloss) as well as six red and white fat quarters (all are 18" x 21" except for the white with red dots which is a 20" square).  The red is perfect for any holiday projects including Valentine's Day which is coming up in only a couple of months.  Any suggestions for future prizes are always welcome, just comment below.
Link up photos of your Section C blocks below to be entered for this months prizes. Remember link ups will be open until 18 Jan 2015 at 11:55pm EST, so don't forget to come back and show us your work!


Thanks so much for quilting along or just checking out everyone's progress.  Happy sewing!

Thursday, November 6, 2014

Modern Building Blocks Quilt Along: Month 2 - Section B

First off, many apologies for the delay in this blog post!  I feel terrible that I have been so behind these past couple of weeks, however, hopefully this will not be an issue again in the future, fingers crossed.  And I am sure you guys who entered last month (you are awesome by the way) are wondering about the prize, so I won't keep you waiting any longer on that front.  If you haven't already done so, please check out everyone's entries for Section A.  They are wonderful and I am hoping to get more people to join in with us as we move along.
Our winner for Section A entries is #4 Stacey!!!  Thanks so much for linking up and I will contact you via Instagram or feel free to email me so I can get your prize to you as soon as possible.

Now on to the new stuff....Section B!  This section is nice because there are only three block, but as you know the one is monstrous.  Since there were only three, I will go through mention a few things about each of them along the way.

Block #1, 36"


So, I made this block first because I have to admit I have been itching to make this giant block ever since I first saw this pattern.  And it is definitely awesome, however I had a bit of trouble with mine.  Not so much with the construction, but with it not being the correct size.  Mine turned out about 1.5" too small...pretty hard to fix that much of a difference.  When I was piecing the center pieces (the red and white)  they went together fine, things lined up and all seemed well, however when I went to add the blue triangles around it they seemed really large.  So, I trimmed then down to have a quarter inch seem allowance on all side, which then of course made the next pieces too large.  After all the trimming I realized that wasn't very smart since now my block would not fit in its place!  After staring at my block for a very long time, I decided to remake the block.  I was not really loving how the block looked with the rest of my blocks either, so this just solidifies my decision to remake the block and change the colors as well.  Please let me know if any of you run in to any similar problems.  It is however very possible that I cut the center pieces incorrectly, especially since I was doing some middle of the night sewing.  Here is what I was thinking for the new colors.  A perfect blend of Sweetwater and Bonnie & Camille!


Block #5, 18"


This block was pretty straightforward and appears to have turned out fine.  I like this one!


Block #6, 18"


This block was super fast to piece since there were no half square triangles!

And here are the blocks all together (but not sewn yet since I have yet to make my Block1 replacement).


I certainly cannot wait to see everyone's Section B, but let's move on to the fun stuff shall we...this month's prizes!  This month the prize will be a Botanics by Carolyn Friedlander Aurifil 10 Small Spool Collection.  It includes 10 beautiful colors of 50wt 100% cotton thread for a total of 2,220 yards!  Please link up your Section B photos below by 11:55pm on November 30th for a chance at this awesome prize.


Also, please feel free to leave comments on this post for suggestions on futures prizes or any other question or concern you might have.  If you are on Instagram, please tag your quilt along photos with #modernbuildingblocksqal and tag me as well please @goobadesigns!  Thank so much again and hopefully you will join in on month two of our quilt along.

Wednesday, October 1, 2014

Modern Building Blocks Quilt Along: Month 1 - Section A

UPDATE:  If you are using a Moda Modern Building Blocks kit, you will want to follow the instructions to cut the pieces for the larger blocks first (and set aside) to make best use of the fabric provided in the kit. This was not mentioned previously and I just wanted to state that as soon as possible.  Thanks so much Lisa for bringing that to my attention and thanks to all of you for joining in! 10/4
 
Hi everyone!  Are you ready to kick off this Modern Building Blocks Quilt Along?  Well, I sure hope so, because I managed to finish the first set of blocks for Section A, so I know that you guys can too!  Check out my previous post for the quilt along to get an awesome printable checklist and see a few more details on how the quilt along will be broken down.  
This first month (October) we are completing the blocks in Section A, which includes numbers 8, 10, 12, 17, 19, 20, 39, 41, 42, and 44.  Cutting instructions for each block are located on the bottom of each block's card. If you are using the Moda kit then it is even color coded and has the Bella solid item number next to it for ordering purposes. 
I am not using the Moda kit or Bella solids, but actually a variety of prints.  All of my pieces so far have been cut from fat quarters except for one of the prints (Centerpieces in Vanilla from Wishes by Sweetwater) that I have used in several of the blocks of which I have used a half yard cut so far.  I am not totally sold yet on the approach I decided to take on this one.  I do hope that it turns out the way I am imagining it in my head, but only time will tell I suppose.  I am hoping after adding Section B my plan will be a little more apparent and that I will be a little happier with how it looks.  Can you see where I am going with it?
Here are the individual blocks from Section A in ascending order:

Block 8 - 18"

Block 10 - 12"

Block 12 - 12"

Block 17- 12"
Block 19 - 6"

Block 20 - 6"

Block 39 - 6"

Block 41 - 6"

Block 42 - 6"

Block 44 - 6'
And here they are all put together in Section A.
The link up below will be open until October 31, so you will have the whole month to get your first set of blocks finished.  You can definitely work ahead but please only link up one photo of your entire Section A blocks and this will enter you for this month's prizes, which includes a gorgeous Somerset Honey Bun and the Navajo Stars Pattern both by Fig Tree & Co. from my Etsy shop.
You can link up your photo at anytime during October and if you are an Instagram user please tag any of your photos for the quilt along with #modernbuildingblocksqal and you can tag me as well @goobadesigns.  I would love to see any of your progress!


I sure hope you can join in on this quilt along with the Moda Modern Building Blocks quilt pattern at any point along the way.  I cannot wait to see everyone's blocks!  And, of course, any feedback is welcome and please feel free to contact me at any time. 

This post is also linked up with WIP Wednesday at Freshly Pieced.

Tuesday, September 23, 2014

Modern Building Blocks Quilt Along: The Plan of Attack

Do you love the new Moda Modern Building Blocks Quilt Pattern?  Sampler quilts are so fun and this one definitely does not disappoint!  I would love some company while piecing it all together, which is why I want to host a Quilt Along; it would be the perfect opportunity to make this beautiful quilt and see others' versions along the way!  Did I mention prizes for participating?

Below, I have included a rough outline of my thoughts on how to organize the quilt along and based on your feedback I can perhaps determine if anyone is even interested in playing along.


The Breakdown

There are 48 total blocks that make up the quilt.  The sizes of the blocks vary from 6" up to 36".

In the "Block Placement Diagram" of the pattern, the quilt is already divided into seven sections, A through G.  I figured we could use that as a monthly guide.  For example, for the first month we would need to complete the blocks in Section A, then the second month complete the blocks in Section B and so on.  Some months will have more blocks than others, but perhaps it will allow time to play catch up if needed.

Section A:  Blocks 8, 10, 12, 17, 19, 20, 39, 41, 42, 44 (October)

Section B:  Blocks 1, 5, 6  (November)

Section C:  Blocks 3, 11, 13, 15, 16, 23, 24, 29, 48  (December)

Section D:  Blocks 4, 7, 9, 14, 18  (January)

Section E:  Blocks 26, 27, 30, 32, 40, 47  (February)

Section F:  Blocks 21, 28, 31, 33, 34, 35, 37, 46  (March)

Section G:  Blocks 2, 22, 25, 36, 38, 43, 45  (April) 

If you click on the chart below, you can get a pdf file of a checklist for the quilt along courtesy of my amazing sister (and graphic designer), Stefanie.

https://drive.google.com/file/d/0B27zrNP9MDrXRVdmZWN1Mng0bEU/edit?usp=sharing

For each section, there will be a post at the beginning of the month talking about the blocks within the section and it will include an area to link up photos and/or blog post of your completed blocks/section for the month.  You will have until the end of the month to link up your photos and posts.  We will have a prize each month for a randomly chosen winner from the linked up entries!  At the end, we will have one grand prize winner chosen at random from all of our quilt top entries some time in May.  Prizes are still to be determined, but will be included in the monthly post for each section.

I still have a one Modern Building Blocks kits and a few patterns available in the Etsy shop if you need it or are interested.  I am also hoping to get some monthly kits put together as well, however that will depend on interest.

Any feedback would be greatly appreciated, so that we can streamline this event as much as possible.  I am super excited and I hope you will come and join the fun!  Oh, and did I mention PRIZES?!


Sunday, September 14, 2014

Cotton + Steel Origami Blossom Mini Quilt

 I recently had the pleasure of trying out a super cute digital quilt pattern by The Aqua Umbrella (@vrrigney) called Origami Blossoms Mini.  
When I first saw the pattern, I knew I wanted to use Cotton + Steel fabric.  As I am sure most of you know already, one of the amazing and wonderful aspects of the Cotton + Steel collections is that you can make so many different combinations.  This combination of prints was one I had it my mind since the first time I saw the collections.  I used the unbleached Mochi linen cotton blend from Moda for the background and I love how it turned out!  Then again, I can't get enough natural linen.  The only difficulty I had was figuring out how to quilt it.  
 I can never seem to make anything easy!  That said it is finished and ready to go up on the wall.
You can obtain a copy of the digital pattern through the link above or just search in the Craftsy Pattern Community.  
I have also put together a fat quarter bundle with the prints I used for this mini quilt along with few others.  You can find the Horizons bundle below in the Etsy shop.
Thanks so much for stopping by and I hope you enjoy it!  This post is linked up with Show Off Saturday at Sew Can She.

Friday, August 8, 2014

Cotton + Steel Lily Dress by Green Bee Patterns: A Friday Finish

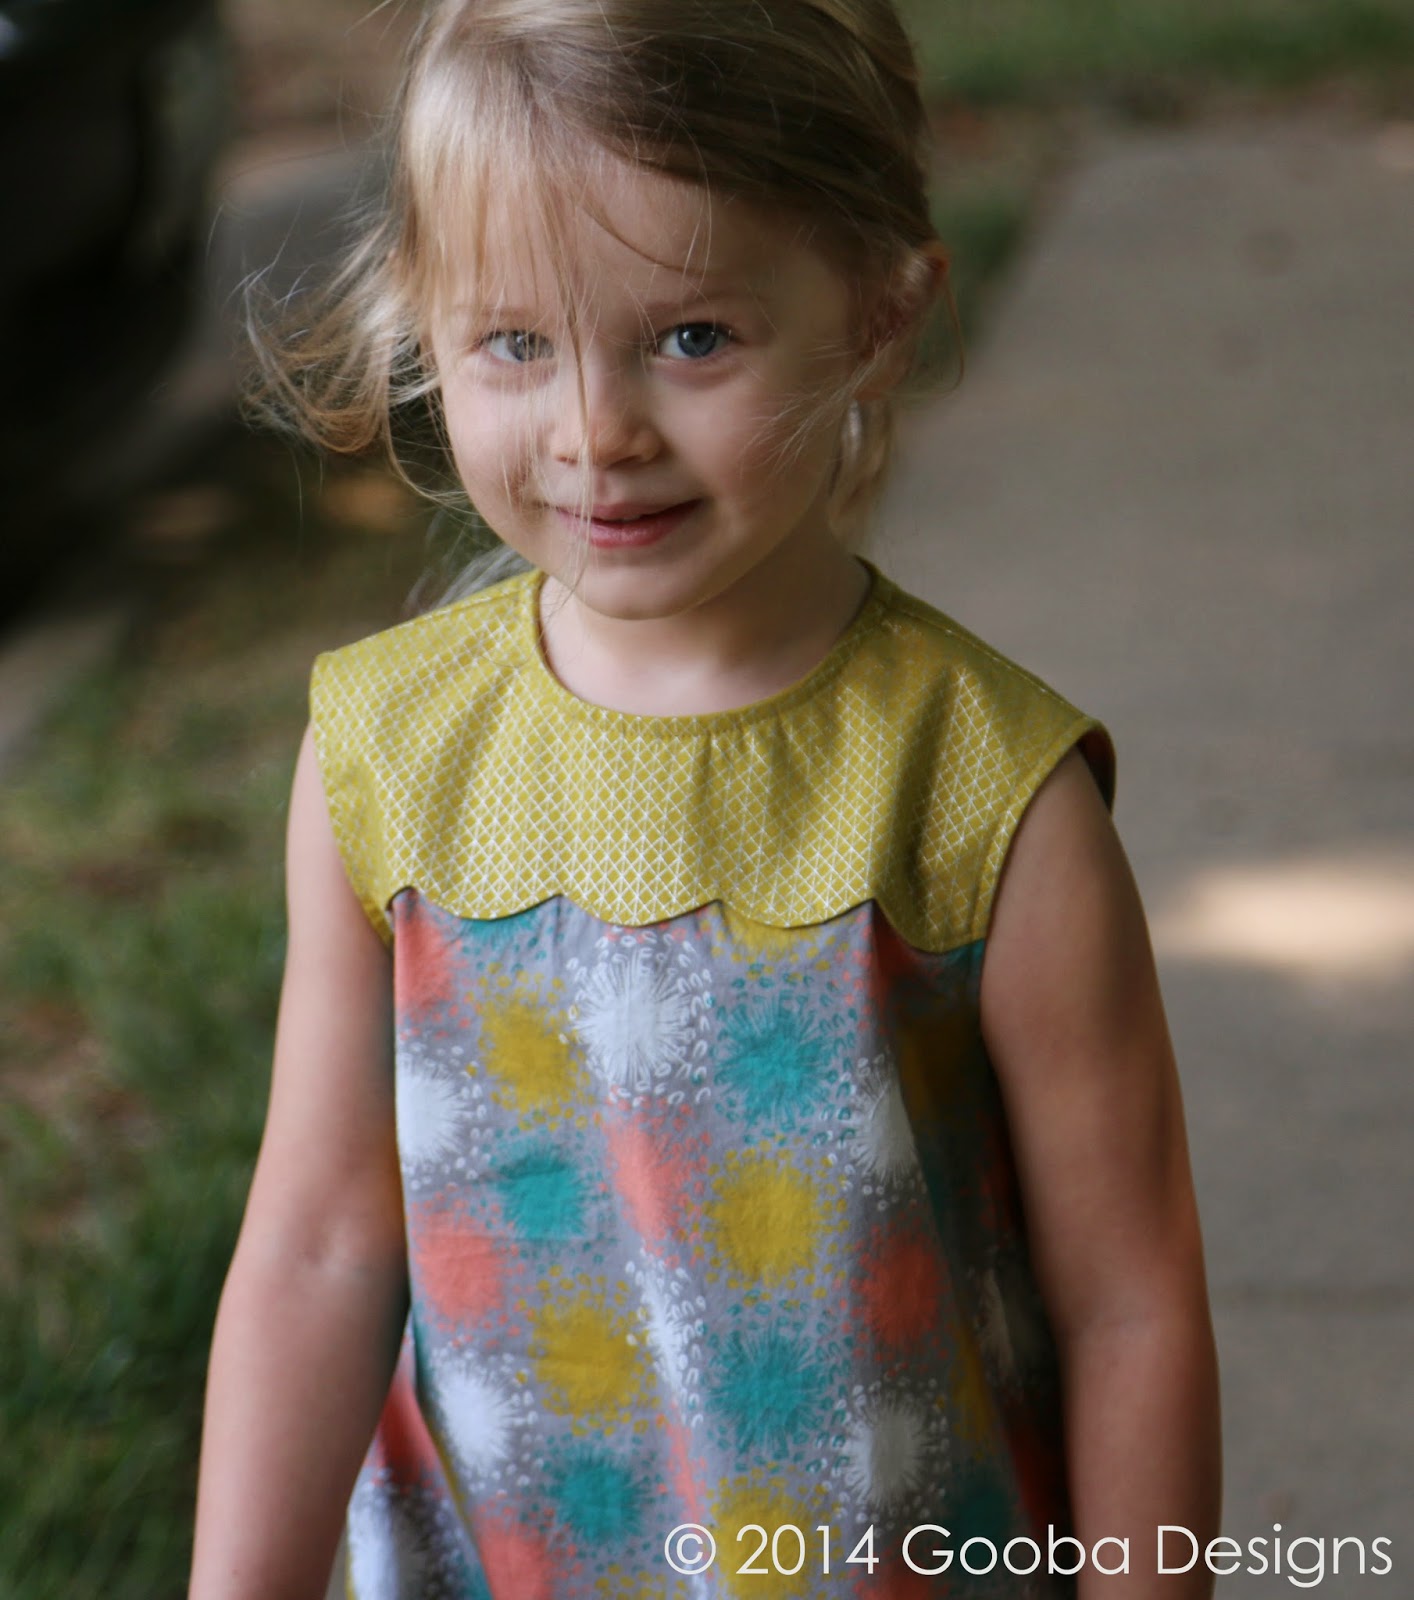
I finally got my hands on some Cotton + Steel and, of course, fell in love with it just like everyone else.  One of my favorites, besides the linen canvases, are the cotton lawns.  Gorgeous fabric, to say the least.  I have two of the lawn prints in the shop, but now I wish I would have purchased all of them!  Anyway, I took the Goob to a fabric shop recently and she asked me to make a Lily Dress by Green Bee Patterns for her.  
The one in the shop was made with C+S prints as well, but with the pink butterfly print, The Monarchy in Byzantine, and Tangrams in Gray both from the Moonlit collection by Rashida Coleman-Hale. 
It was super cute, however I asked the Goob if she wanted to pick a different fabric for the dress and she agreed!  I, of course, asked her to choose from the prints I already had, and luckily she chose Dandelion from the August collection in the cotton lawn.  I LOVE that print!  The lawn fabric is so soft and the colors are wonderful.  Then, I chose the accent fabric for the yoke, and went with the C+S Basic print, Netorious in Goldilocks...which has metallic ink.  In my opinion, the two prints go together beautifully.  The metallic Netorious print in Goldilocks is really outstanding.  It has such a pretty shimmer, but is not over the top.  Okay, enough talk....here is the dress.


One of my favorite details, besides the adorable scallops, is the vintage glass button that the Goob chose for the back.  It couldn't be more perfect for the dress!  As for the pattern, I would like to make another dress before I write a review and the Goob has already chosen her next print!  We are going to be using the border print lawn from C+S called Palm Springs in Aqua which is from the Hatbox collection by Alexia Abegg.  
 A little trivia for you Alexia is also the brains behind Green Bee Patterns!

Thanks for stopping by and I hope you make your way back soon.  This post is linked up with Finish It Up Friday at Crazy Mom Quilts and Show Off Saturday at Sew Can She.


Saturday, July 12, 2014

Foxglove Tank Pattern Using Desert Blanket Arizona Knit

Hi there!  I am sure I have mentioned it before but I love the Art Gallery Arizona Knits and I have been scheming ways to use it.  So when I saw that the new Foxglove Tank Pattern by Selvage Designs could be used with knits....I was in!  Since I used the Tomahawk Stripe for my My Dress, I used the Desert Blanket knit for this tank.  Both are still available in the shop.
The Foxglove pattern is great!  It is simple and straight forward with plenty of diagrams and options.  I really have no complaints with it.  I do, however, need to get a racerback bra, because the only thing that I had that would work was a really old and terrible sports bra which I am sure you noticed is not very flattering.  Anyway, great tank, and I hope to make more.  I have a rayon slub knit that I have been waiting for the perfect pattern to use and I think this will be perfect!
I did have one issue that had noting to do with the pattern.  I wanted to use a twin/double needle to hem the bottom, neckline and arm holes, since this is often suggested for knits.  The twin needle that came with my machine would not work, so I went to Joann's in search of a twin needle I could use.  Well, there was only one to chose from.  The package said that it could be used for knits so I went for it.  Unfortunately, I had the most difficult time finishing the hems.  I took them out multiple times and tried everything I though I could and I still had skipped stitches.  I think that the issue is the needle, but I am not sure.  I have had trouble with some knits before doing this, also with a straight stitch but only a single needle.  Anyway, do any of you have any experience with this that you might be able to share some advice with me?  It would be tremendously appreciated. 
Overall, this is a wonderful pattern and a gorgeous knit.  I will have to investigate a bit on the twin needle front, but other than that I want to make more.  I have a couple of different ideas for the hems on the next one, so perhaps I will skip the twin needle all together for that one!

Thanks so much for checking out my post, I do greatly appreciate it!

This post is linked up with Finish It Up Friday at Crazy Mom Quilts and Show Off Saturday at Sew Can She.

Thursday, July 10, 2014

Swaps and Tops: A WIP Wednesday Edition

I recently joined another swap on Instagram; the #shabbycottageswap with Mini Dwell Blocks.  This is only my second swap and my first swap technically isn't over yet; the #schnitzelandboominiswap.  I have already sent out my swap items, but I haven't received mine yet.  I am not sure that I am cut out for this swap business yet, because I stress myself out way too much!  That said, my partner will hopefully receive it soon which should relieve a bit of the stress.  It sure had a heck of a long way to go, and the suspense is killer.  Anyway, hope you enjoy it partner!


As for the new swap, I just finished my nine mini blocks and now I am paranoid that these won't be good enough.  Oh well, they are finished and now I just need to get my labels made and send them out.  But I need to stop starting new things and finish some of my many works in progress....bah, who am I kidding, that is never going to happen!

 I have also been dragging my feet on a Foxglove Tank that I am almost finished with using some Arizona knit from the shop.  I think I am going to love this tank.  Hopefully I can buckle down and get it finished to show you on Friday.
And I did get a bit more finished on my new Juggle Quilt using the 25th and Pine Honeycomb hexagons.  I made the pieced hexagons and finished cutting all of the pieces.  I also sewed the first three row together, which really isn't that much I suppose, but it should go much faster now since all of the pieces are ready.  I am pretty excited about this one!
Thanks so much for checking out my post and I hope you stop back by on Friday when I hopefully post about my new knit Foxglove Tank.

This post is linked up with WIP Wednesday at Freshly Pieced.