Pages

Friday, November 29, 2013

Finish It Up Friday: Knit Top and Towels

I , of course, was hoping to get more finished up this week however between the traveling and baking I didn't!  One project I had to finish, because it was a gift that I need for Thanksgiving Day, was a set of dishtowels for my sister-in-law.  Sweetwater makes awesome iron-on labels and I couldn't resist a set of three that said "mix, measure, and stir."  I also had just ordered some French General toweling from Moda fabrics that already has finished sides, so it would be a super simple and easy but cute gift.  Here is the result, and I might just have to order another set of labels so I can make a set for myself!
Below is a close up of one of my favorite labels.
In addition to the dishtowels, I did manage to procrastinate on a couple of other projects by making another knit top.  I used the same pattern for my short sleeve knit tops that I made preciously, New Look 6216, however I tried the three quarter length sleeve version instead.  One of the great aspects of this pattern is that you do not have to attach any sleeves, the torso and sleeves are all one continuous piece.  You can see the shape below...anyone want a hug?
This aspect is also somewhat of negative depending on what kind of knit you are using, because there tends to be a lot of extra fabric under the arms which is not always so flattering.  I used a striped thin jersey knit, but the problem is that the fabric likes to cling to itself and other fabric making it do funny things especially around my chest area!  Anyway, I still like the top and I especially like that I successfully lined up the stripes...yay!  Long story short, the top was easy to make and super comfy to wear.
I actually did iron the top before I put it on because I washed and dried it up then put it in my suitcase for our trip.  I guess I did not iron it well enough! Below is a side shot.
If any of you are interested, I am having a Black Friday Weekend Sale in my Etsy shop through Sunday, where everything is an additional 15% off with coupon code BLACK15.

Thanks for stopping by and I hope you get lots of sewing done during your holiday weekend!

This post is linked up with Finish It Up Friday at Crazy Mom Quilts.

Saturday, November 23, 2013

Finish It Up Friday: Mermaid Penny Patch

I did end up getting the Mermaid Penny Patch quilt top finished for the quilt along over at Stitched in Color.  I pretty much worked until my eyes did not want to stay open, but I got it done.  The quilt was by no means difficult, however I did grossly under estimate how long it would take me to piece the top together.  Below is an image with flash.
Below is a photo of the quilt outside (the colors are a bit better), however it was really windy as you can see at the bottom of the quilt!
And then below is just a slight close up of some of the prints...the Heather Ross mermaid print was the inspiration here of course.
This post is linked up with Finish It Up Friday at Crazy Mom Quilts, Show Off Saturday at Sew Can She and the Penny Patch Linky Party at Stitched in Color.

Wednesday, November 20, 2013

Wednesday WIP: Two Quilts and a Stocking

Well, my WIPs this week are continuations of my projects from last week and one from a while ago, so I will keep this short.  First off, I am going to talk about my Mermaid Penny Patch Quilt for the Penny Patch Quilt Along at Stitched in Color.  It might not look that different from my photo last week, however I finished some more of the pieced blocks.  I have all of the pieces cut out, so I am hoping to get the top finished this week, so I can get to the quilts I really need to get finished!  So, below is a group of the blocks, but I think I still need to mess with placement a bit.
I think as I get some different combinations of the pieced blocks, I can improve the distribution of the blocks.  Below are a few of the pieces grouped together for the pieced blocks.
Okay, and really quickly here are a few of my favorite blocks.  They are mostly mermaid blocks because I pieced all of those first!
The next project I am hoping to finish this week, especially since I have all of the half square triangles done for it already is the Round and Round quilt for the quilt along on Instagram which you can ready more about over at Thimble Blossom.  I am only doing five of the seven blocks for the quilt and I have three of those five done already.  
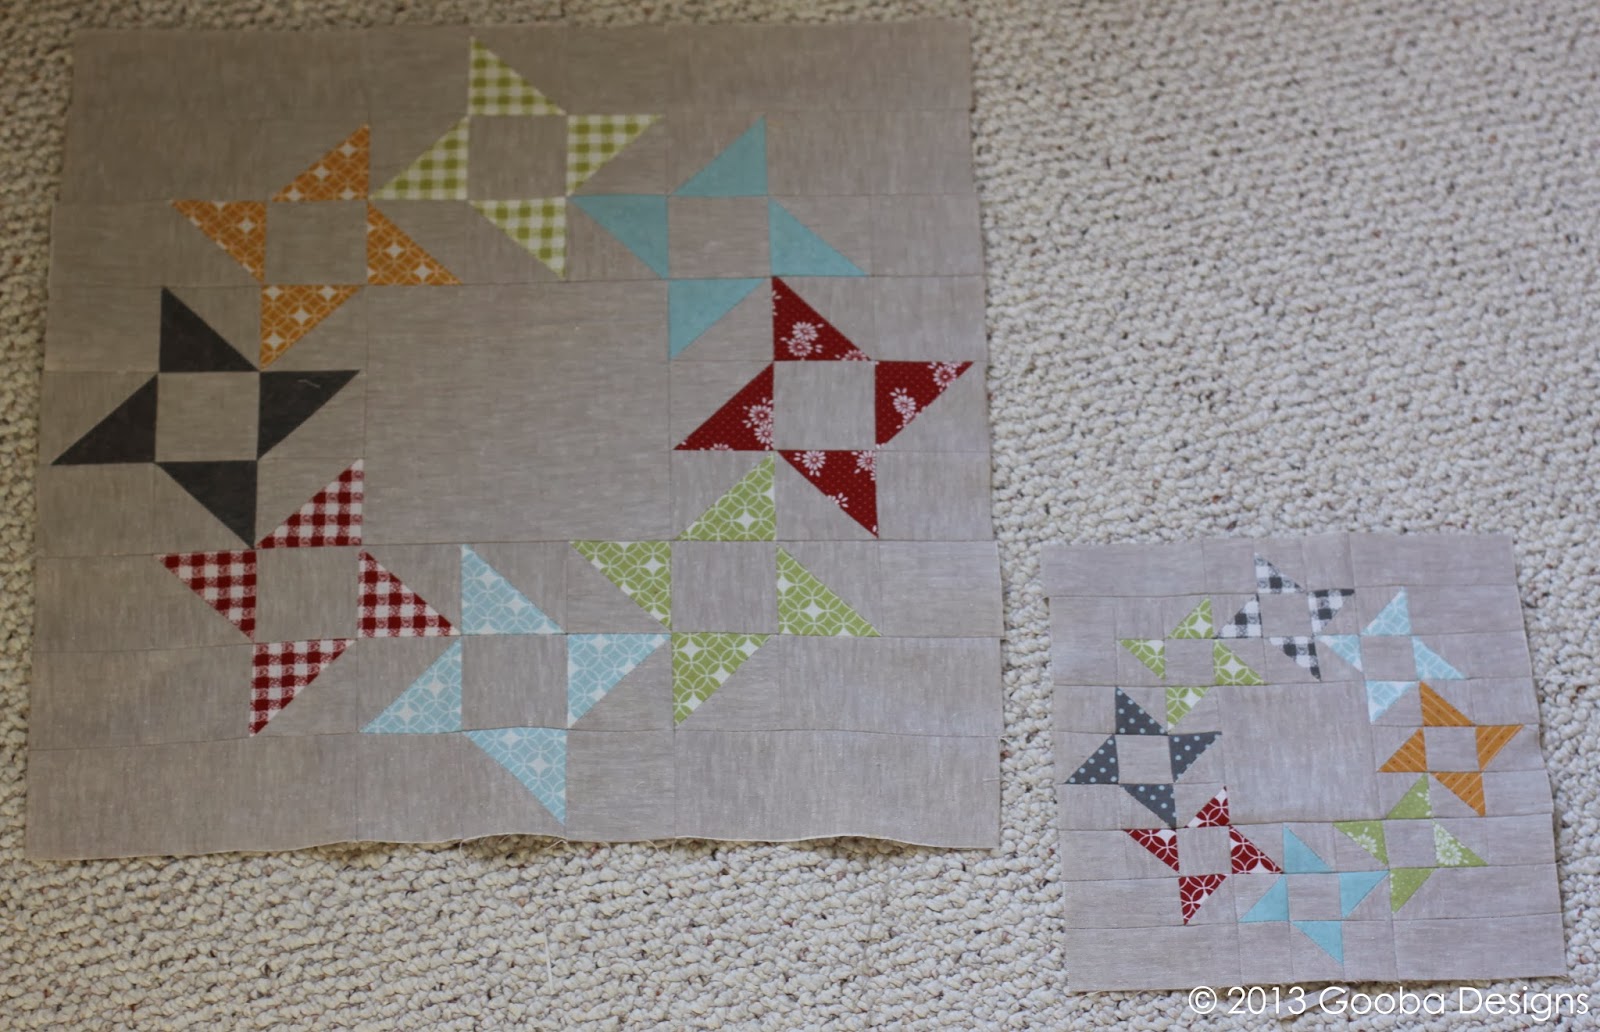
I also made a "mini" block out of the scraps from the half square triangles.  The mini (which is a 9.5" square) wasn't nearly as small as I wanted it to be but its a start.  I got the idea to do this from Camille's mini quilts, which are super cute!
 Here is the small block on top of the full size block.
Here is the small block with a 2.5" square ruler in the center.
Lastly, I finished another stocking front.  I just need to quilt it, along with my sister's tree skirt.  I am also going to try and get these two things done this week as well.
Thanks so much for stopping by, hopefully you will stop by again later to see what I actually get finished!

This post is linked up with WIP Wednesday at Freshly Pieced.

Friday, November 15, 2013

Friday Finishes: Advent Calendar and Voile Infinity Scarf

With so many projects that I am trying to work on right now, the only one that had any hope of getting finished today was the advent calendar for the Countdown to Christmas Quilt Along at Better Off Thread.  All I had left to finish on it was the binding, as well as pockets and tabs on the back for hanging.  It never fails though, when I am trying to finish something in a hurry, something inevitably goes wrong.  Because I was short on time, I decided to sew my binding on with my sewing machine.  I normally hand sew my binding, and I never have a problem when using a 2 1/2" wide strip of fabric folded in half and then sewn on with a 3/8" seam. However, I guess I need to make my binding a little wider if I am going to machine sew it in the future, because I had a terrible time catching the binding on the back of the quilt with the stitching.  With all of the trouble I had, I felt that I might as well have just finished it by hand!  Anyway, I wasn't too worried about it since it will be on the wall and only up at Christmas.  I have been told many times not to sweat the small stuff, so I am considering this a small thing for now.  I decided to do a scrappy binding since I have never done one before and the calendar is scrappy anyway.  I couldn't resist taking a photo of the cute little roll.
Now here it is on the finished product.  I sort of wanted it a little more scrappy but got lazy...oops!
Well, it is done!  And I have to say I am pretty proud of myself for starting and finishing a project for Christmas well before Christmas....and in the same year I might add!  Sorry Steffy, you will have your tree skirt this year, for sure.
The advent was finished before I lost my photo light, however the voile infinity scarf, that I wanted to make as a gift, didn't make the cut.  I did finish it though....yay!  It really didn't take much time at all, which I love.  I usual think something isn't going to take as long as it actually does, but this one was really fast, and I LOVE the outcome.  I almost want to keep it for myself, but since it was so easy I could probably sneak one in for myself at some point down the line!  Below is a photo of the scarf wrapped three -times, and again sorry for the lighting.  I used It's a Plus voile from Rashida Coleman-Hale's Koi Collection with Cloud 9 Fabrics.  I truly love that fabric.
The photo below just shows the scarf length.  You can really wear it so many ways, but I am going to let you use your imagination since I am a not-so-good model.
Thanks so much for stopping by!  This post is linked up with Finish It Up Friday at Crazy Mom Quilts.

Wednesday, November 13, 2013

WIP Wednesday: Too Many WIPs

The last thing I need to do is start another project, yet I just can't help myself.  Even though I should be working on two baby quilts for my sisters friends who are having twin boys....very soon I might add, I decided to start two other quilts...genius!  Anyway, I have at least, gathered the fabric to use for the two baby quilts as you can see below.  Now I just need to get cutting.
As for the others I just had to start, the first is a Round and Round quilt by Thimble Blossom.  Camille Roskelley started a Round and Round quilt along on Instagram and I got sucked in!  I love her quilts and fabric so much, I couldn't resist an excuse to make one.  I decided to use a Flats charm pack and Essex linen in Flax as the background fabric.  I really like it.  I think I am however only going to make five instead of the seven blocks that the pattern calls for and then just use more background fabric....we will see what happens.
The next new quilt is for the Penny Patch quilt along at Stitched in Color.  I loved Rachael's versions, her color combinations are so great, and I wanted to step out of my comfort zone and try my hand at it.  I am not sold on my choices yet.  I am hoping that once it is all finished I will like it a little better.  I used only fabric in my stash and it made me realize how few low volume fabrics I had, since the throw size quilt called for 10 different prints.  Like I said this is a bit of an experiment, however I decided to use one of my coveted fabrics that was SUPER hard for my to cut!  It was my Heather Ross mermaid print.  I have had it forever and was saving it for something special, and I decided to just go for it with this quilt.  I hope I am not disappointed in the end...
I am a bit behind though in the quilt along, as I am not even done with my cutting yet (as you can see below) and I think I am supposed to have 40 or more blocks done or something.  Anyway, some people are already done and theirs look great.  Rachael just opened the linky party up the other day, you should check them out!
Lastly, I am trying to decide on how to quilt my sister's tree skirt I made her...uhh, a while ago!  I really need to get my sewing machine serviced, but I just can't part with it right now.  Too much to do!  Anyway, below I have a photo of the tree skirt basted and ready to be quilted, but how?  Any suggestions would be welcome.  The piecing sort of creates a star shape that I was thinking of highlighting with the quilting...but I don't know...
Well, I better get back to sewing, wish me luck!

This post has been linked up with WIP Wednesday at Freshly Pieced and with the Penny Patch quilt along at Stitched in Color.

Sunday, November 10, 2013

Countdown to Christmas Quilt Along: Quilting

I just finished the quilting on my advent calendar quilt for the Countdown to Christmas Quilt Along over at Better Off Thread.
I wanted to do something fast, but still unique.  I really like pebble quilting and I thought it would look neat on the advent quilt because it looks similar to snow.  Since, it definitely takes a lot of time to do, I decided only to do it around the very outer edge of the quilt.  Then along the vertical columns in between the pockets I did a holly and berry pattern.  
Lastly, in the little horizontal rectangular areas between the pockets I did a loopy like design that I decided I really like as well.  
I think I like the outcome.  I always try not to quilt really small and close together, but I always end up doing it that way anyway!  My pockets also ended up getting really puffy.  I tried to keep this from happening, but I think because there were so many layers when I would quilt up to it the free motion foot would basically push the pocket away...even when I held it.  Anyway, long story short, its quilted!
Quick note about thread quality.  I was having a terrible time with my bobbin thread nesting underneath my quilt as well as the upper thread breaking repeatedly.  I tried what I thought was everything to fix it to include changing the needle twice, re-threading everything multiple times, taking apart the machine and cleaning it out, etc....  Then it wasn't until I changed my thread to lovely Aurifil thread did the problem stop....completely!  I wasn't completely convinced of the importance of good thread until I started sewing with Aurifil and I will tell you I am now a firm believer.

Saturday, November 9, 2013

Cosmo Bag From Style Stitches: A Pattern Review

Well, here it is, the finished Cosmo bag from Amy Butler's Style Stitches.  I think I like how it turned out and as for the "easy" piece, it was for the most part easy, but there were a couple of aspects that I considered difficult or frustrating.
The pattern called for quilting weight cotton with every piece interfaced with the suggested Pellon SF-101.  I, however, used canvas fabric for the handles and outer fabric.  The only canvas that I used interfacing on was the handles, so they would be sturdy.  If was difficult to sew over the seams on the doubled up handles, and if I made it again with canvas I probably would not use any interfacing on handles.  Other than that, the choice of using canvas (with no interfacing) worked well.  Another comment on the interfacing is that if you do use all quilting weight cotton fabric you will be using a lot of interfacing.  I feel on of the most time consuming part of making this bag is cutting out all of the pieces (because of all of the interfacing) and then adhering the interfacing to all of the pieces.
Also, the pattern has two options for handle length.  I chose the longer of the two options, which you can see above.  The longer option allows you to wear the bag on your shoulder, and since it is such a large bag, I felt the longer strap option was essential.  Below is a photo of the side of the bag.  Each side has a pocket.
One of the most difficult, well mostly frustrating aspects of the bag for me was the button loop.  Sounds silly I know, but that is the only part of the bag that I really wasn't happy with.  At the base of the button loop you are supposed to gather the fabric.  I had such a hard time doing this.  The instructions were clear and easy to follow with a well labeled diagram, however my difficulty gathering could have been because I was using the heavier weight canvas fabric.  I just could not get it to gather well.  I think the purpose of gathering it is so that you cannot tell as much that the seam down the middle is not centered.  Didn't work so much on mine!  In addition to the gathering portion I also had difficulty getting the loop on the way I wanted.  This is most likely because I was starting to get frustrated and tired in general, but I am not joking when I say I attached it and then took it back apart 20 times.  I think in the end it looks okay, but ahhhh!  Love my covered button though.
 Just a couple more photos of the button loop as well as a peek at the lining.
In this photo below, you can see the top of the pockets.  There are two pockets on each side of the inside of the bag.  You basically make one pocket panel and then sew down the middle to create to pocket sections.  Easy but a bid difficult to take photos of!
 I pulled the pockets out a little so you could see them better.

Then here is the bottom of the outside of the bag.  The bottom went on fairly easily but had to finesse one of the four corner....not bad really!
Overall, the pattern was easy and I liked how the bag went together.  I generally like Amy Butler patterns, I especially like her diagrams.  The bag is a generous size and with the longer handles it works great carried on the shoulder.  I would recommend this pattern to a beginner with some reservations, I guess I would say make sure you use the recommended quilting weight cotton fabric. Really it is fairly easy but a bit time consuming.  Well worth the time though.  I am excited to use my new bag!

Wednesday, November 6, 2013

WIP Wednesday: Amy Butler Cosmo Bag

Okay, so the plan is to have this bag finished by Friday...
the catch is I am traveling all over the east coast (or at least that is what it feels like) since last Saturday and won't get back home until later on Friday.  I really want to get this sucker done because it has been lingering for so long and I was also hoping to enter into the Purse Palooza link up at Sew Sweetness, which I believe has a deadline coming up really soon.  Anyway, the bag I brought with me to work on is the Cosmo Bag from Amy Butler's Style Stitches.  The bag is listed as being easy (see it down in the bottom corner of the page to the left of the page number) and it hasn't really been difficult thus far, but is sure uses a heck of a lot of interfacing!  
Some of the pattern pieces are not lining up very well, as you can see in the outer side panel and pocket pieces lined up in the photo below.  However I don't think it will cause too much trouble.
Below is an image of the giant button loop and covered button that I made.  Kind of love the button....jury still out on the giant button loop though.
And here is just a close up of the top center of the outside of the bag, before I will clip out triangles all around the inside of the handle and then fold under and press.

I am using a medium weight canvas for the outside of the bag, so I decided to only use interfacing on the straps (for support) and then on the bag lining as it is called for the pattern.  I am using quilting weight cotton for the lining, again as called for in the pattern.  The lining is the fabric to the left below with the pink background.  All fabric is by Heather Bailey.
Now, I mentioned this bag in a previous WIP Wednesday post, however I am definitely further this time.  We can actually see the bag forming.  

Stay tuned to see if I can finish this bag by Friday....wish me luck!

This post is linked up with WIP Wednesday at Freshly Pieced.